本文来自http://blog.csdn.net/hellogv/,引用必须注明出处!
这回要介绍的是Android的Tab控件,Tab控件可以达到分页的效果,让一个屏幕的内容尽量丰富,当然也会增加开发的复杂程度,在有必要的时候再使用。Android的Tab控件使用起来有点奇怪,必须包含和按照以下的顺序:
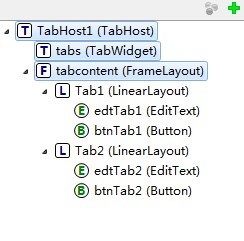
TabHost控件->TabWidget(必须命名为tabs)->FrameLayout(必须命名为tabcontent)。
接下来贴出本例运行的截图:


main.xml的源码:
-
<?xmlversion="1.0"encoding="utf-8"?>
-
<TabHostandroid:layout_width="fill_parent"
-
android:layout_height="fill_parent"xmlns:android="http://schemas.android.com/apk/res/android"android:id="@android:id/TabHost1">
-
<TabWidgetandroid:id="@android:id/tabs"
-
android:layout_height="wrap_content"android:layout_width="fill_parent">
-
</TabWidget>
-
<FrameLayoutandroid:id="@android:id/tabcontent"
-
android:paddingTop="65px"android:layout_width="fill_parent"android:layout_height="fill_parent">
-
<LinearLayoutandroid:layout_height="wrap_content"android:id="@+id/Tab1"android:orientation="vertical"android:layout_width="fill_parent">
-
<EditTextandroid:layout_height="wrap_content"android:id="@+id/edtTab1"android:layout_width="fill_parent"></EditText>
-
<Buttonandroid:layout_width="wrap_content"android:layout_height="wrap_content"android:id="@+id/btnTab1"android:text="Tab1"></Button>
-
</LinearLayout>
-
<LinearLayoutandroid:layout_height="wrap_content"android:id="@+id/Tab2"android:layout_width="fill_parent"android:orientation="horizontal">
-
<EditTextandroid:layout_height="wrap_content"android:id="@+id/edtTab2"android:layout_width="wrap_content"android:layout_weight="300"></EditText>
-
<Buttonandroid:layout_width="wrap_content"android:layout_height="wrap_content"android:id="@+id/btnTab2"android:text="Tab2"></Button></LinearLayout>
-
</FrameLayout>
-
</TabHost>
程序源码:
-
packagecom.testTab;
-
importandroid.app.TabActivity;
-
importandroid.os.Bundle;
-
importandroid.view.View;
-
importandroid.widget.Button;
-
importandroid.widget.EditText;
-
importandroid.widget.TabHost;
-
importandroid.widget.TabHost.TabSpec;
-
publicclasstestTabextendsTabActivity{
-
-
ButtonbtnTab1,btnTab2;
-
EditTextedtTab1,edtTab2;
-
-
@Override
-
publicvoidonCreate(BundlesavedInstanceState){
-
super.onCreate(savedInstanceState);
-
setContentView(R.layout.main);
-
-
TabHosttabs=getTabHost();
-
-
TabSpectab1=tabs.newTabSpec("tab1");
-
tab1.setIndicator("tab1");
-
tab1.setContent(R.id.Tab1);
-
tabs.addTab(tab1);
-
-
btnTab1=(Button)this.findViewById(R.id.btnTab1);
-
edtTab1=(EditText)this.findViewById(R.id.edtTab1);
-
btnTab1.setOnClickListener(newClickEvent());
-
-
-
TabSpectab2=tabs.newTabSpec("tab2");
-
tab2.setIndicator("tab2");
-
tab2.setContent(R.id.Tab2);
-
tabs.addTab(tab2);
-
-
btnTab2=(Button)this.findViewById(R.id.btnTab2);
-
edtTab2=(EditText)this.findViewById(R.id.edtTab2);
-
btnTab2.setOnClickListener(newClickEvent());
-
-
tabs.setCurrentTab(0);
-
}
-
-
classClickEventimplementsView.OnClickListener{
-
@Override
-
publicvoidonClick(Viewv){
-
if(v==btnTab1)
-
{
-
edtTab1.setText("tab1");
-
}
-
elseif(v==btnTab2)
-
{
-
edtTab2.setText("tab2");
-
}
-
}
-
-
}
-
}
分享到:


相关推荐
Android入门第十一篇之TabHost,TabWidget.docx
Android TabHost TabWidget 切换卡
Android_TabHost_TabWidget选项卡总结
TabHost+TabWidget+FrameLayout实现主页面实现底部栏;
本文实例介绍的是Android的Tab控件,Tab控件可以达到分页的效果,让一个屏幕的内容尽量丰富,当然也会增加开发的复杂程度,在有必要的时候再使用。Android的Tab控件使用起来有点奇怪,必须包含和按照以下的顺序: ...
http://blog.csdn.net/birdno1/article/details/50516725 通过自定义view解决tabwidget下划线颜色问题
Android TabHost示例使用XML TabHost和TabWidget的Android Tab示例。 单击下面的链接以获取教程。演示版![ALT文本( “可选标题”)
自定义样式的tabHost,包含两种方式:activity对象作为内容、View对象作为内容。注释详细
主要介绍了Android程序开发之自定义设置TabHost,TabWidget样式的相关资料,需要的朋友可以参考下
Android 嵌套TabHost示例. 两层TabHost嵌套,实现的效果类似网页上的二级菜单栏。
Android实现tabHost控件自定义页签页面源码
android Tabhost使用Demo
使用了自定义button,自定义tabhost使用了不同默认的上标签切换页面
android 页卡效果,用tabhost实现最简单的页卡效果
androidTabhost的使用实例代码,仅供参考
Android TabHost嵌套示例,像电脑端一样在屏幕上显示上下嵌套的TAB效果,单击后切换内容,在内容页上又重新显示二级的TAB,实现嵌套,如示例图所示,注意:对于TabHost、布局文件中必须包含: TabHost、TabWidget ...
Android Tabhost 实例demo 自定义Tabhost实现实例。
Android TabHost ListView初学者的实例代码